|
|
|
|
|
|
|
|
|
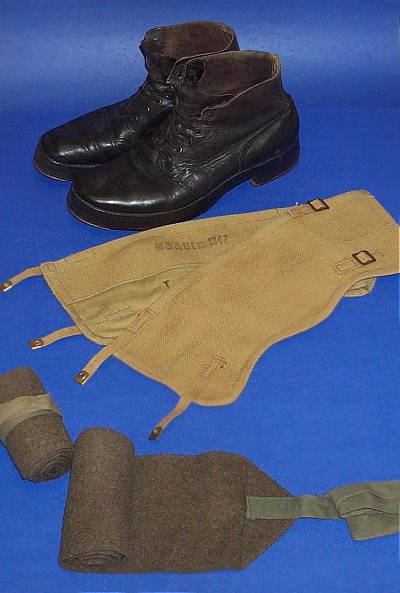
Second World War Equipment Primer by Tim Sullivan (1st Canadian Parachute Battalion Re-enactors) Frequently questions are asked about what the Canadian soldier wore in the Second World War, what equipment he used, where can I find uniforms/equipment and how do I know it’s real? This quick little primer will hopefully help to answer some of those frequently asked questions. The Canadian UniformBootsThe standard boot for the Canadian infantryman was the "ammunition" boot. This was an ankle-height black leather boot that was quite similar to the British model differing mainly in the lack of a toe cap. These boots were then given heel and toe irons and hobnailed. Web anklets,
also known as gaiters, were worn with the ammo boots. These were made from
the same khaki web material as the rest of the Pattern 37 web gear. They
were worn wrapped around the ankle with the tabs pointing towards the
rear, and the battle dress trousers were bloused over the tops.
Soldiers of the 3rd Canadian Division made the "High Top" combat boot famous, and because they were originally issued these boots for the Normandy Invasion, these boots are sometimes referred to as "Invasion Boots" or "Assault Boots". They were actually fairly common in 1944, and the Second Division had been among the units conducting field trials on them. Original pairs are very rare, and consequently expensive, but a passable imitation can be made by converting Canadian postwar Mk III Combat Boots at a local shoe smith, by adding the distinctive buckle-top leather cuff, as well as leather soles. Battle DressThe Canadian soldier was outfitted in the Pattern 37 Battle Dress Uniform. This consisted of a blouse and trousers, both constructed of a greenish-khaki wool material. The uniform differed from its British counterpart in that the wool was greener in colour and often had better material and construction. The Battle Dress blouse was closed by several buttons on the front with a belt that fastened on the right side. There were also two large pleated patch pockets on both jacket breasts and two hidden pockets inside the khaki lining of the jacket. The collar closed by a lone button under the right collar or by two hook-and-eye closures. The jacket also featured epaulettes on the shoulders. All buttons on the BD blouse, save the epaulette buttons, were hidden under a flap of the BD materials.
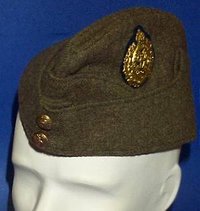
Note the lapels on the front of the blouse postwar battledress blouse above, the most prominent feature of 1949 Pattern BD. When purchasing supposedly original wartime BD, don't let insignia fool you - despite the wartime insignia on this blouse, it is most assuredly post war. The unusual chevrons on the sleeve are Canadian postwar issue. At right, re-enactor Jean Merrette of the Quebec-based Le Regiment de la Chaudiere Re-enactment Unit shows a wartime blouse, buttoned at the neck per regulation. The Battle Dress trousers were a fly-fronted pant with button closure made from the same wool material as the blouse. They featured a large map pocket on the left leg closed by a flap as well as a pleated First Field Dressing pocket on the upper right leg. The BD trousers were held up by the use of leather-tabbed braces (suspenders) that came in two main colours, white and khaki. There were also many instances of privately purchased trouser braces being used. Under the BD blouse, the most often worn item was the collarless Angola wool shirt. This was a greenish wool, and featured a half-front opening closed by several buttons. When the collar of the BD blouse was being worn open, the soldier could wear a khaki collared shirt with a black tie in the latter period of the war. Head DressThe main headgear worn by the Canadian Army in World War II was the Field Service Cap. This was a khaki "envelope" that was worn raked to the right side of the head. In 1943, the Army moved to the beret. This was the typical World War II style of beret with a 10 ˝ inch crown. The universal colour was khaki, with black for Armour and maroon for Airborne units. Other units that had a distinctive cultural background (such as the Highland regiments) would wear specialized headgear such as a Caubeen, Tam O’Shanter or Balmoral. Every regiment or corps would have a cap badge that would be worn on their chosen headgear. This was made of a metal such as brass or sterling silver, with some units having different finishes according to the rank of the wearer. Some units would back their cap badges in fabric owing to unit traditions, such as a tartan backing for Highland regiments.
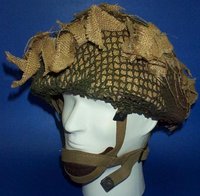
Artifacts and images courtesy Ed Storey During battle the most common helmet worn was the Mk. II helmet, which was worn right through the war in all theaters of conflict. Towards the end of the war the Canadian Army also used the British Mk. III-type helmet which first appeared on the heads of troops going ashore on D-Day. This was a new design with a turtle-liket shape that was offered, officially, 38 percent more protection than the Mk II. Web EquipmentThe basic web gear consisted of
There were several different arrangements of the web gear (known as "orders") where different pieces would be worn in different configurations depending on the situation. Fighting Order
The most common configuration for gear worn by soldiers in the field was Fighting Order. Developed by British veterans of the 8th Army, the soldier's silhouette was reduced by dispensing with the haversack (normally worn in Battle Order on the back), and rolling a day's rations into the gas cape and fastening it to the back of the belt. Sometimes a mess tin would be worn in a second water bottle carrier, and the entrenching tool was often discarded in favour of a full size General Service Shovel or pickaxe. Where to Get Your UniformThe best place to find uniform and kit items is from the Internet. There are a multitude of vendors that sell both original and reproduction uniform items. You can often find those very rare items that are nearly impossible to find much less afford. As well, there are the many auction sites that frequently have interesting items popping up every day. Check the Links section on the Canuck website to find several on-line vendors. Another great source for kit is antique stores. They peddle the kind of "old junk" that we are looking for in our hobby, and you can often find all those little treasures that help complete an impression. They also sell many period items that can be used for a living history display that might not be standard issue. War militaria/gun shows are also a great source for uniform and kit items. They are collections of vendors whose sole trade is all things war. These are often great to go to, as sometimes the vendors have no clue what they really have so some rarer items can often be had for a steal if you know what to look for. Army surplus/camping stores are a great place to find kit….obviously! They usually only stock more recent surplus items, but often you can find some that seem to have a little bit of everything. I have been to some stores that have minimal web gear and nothing in the way of uniforms, while others have bins upon bins of web gear. Small packs, large packs, web belts, braces, water bottles…..you name it, they’ve got it! What to do for a Uniform?Any ankle-height black boot is suitable for re-enacting, as long as it is a close match to what was worn in WWII. Ask your unit commander if you have any questions. For a set of Battle Dress, there are three options available. The first one is to find war-dated items in an appropriate size. This is the most desirable as far as accuracy goes, as you will be wearing what "they" actually wore. Unfortunately, there are several drawbacks. Firstly, it is nearly impossible to find war-dated items of any realistic size. Secondly, there is the increased price that goes along with authentic war-dated items. If one is lucky enough to find war-dated items and can afford them, it is seriously urged that authentic items NEVER be worn into the field for tacticals, and is saved for parade and living history events. Once a basic uniform is in place, all kinds of extras can be added - the leather jerkin worn by Ed Storey at right was a popular cold weather item. The second option is to try and find postwar Canadian BD and modify the jacket and trousers to WWII standards. The major modifications are the addition of the First Field Dressing pocket to the right leg of the BD trousers and changing the collar of the BD blouse. This is an excellent choice as it is still possible to find such items in a reasonable size selection (largest that I’ve found is a size 46-47 jacket, size 43-44 waist pant). As well, the cost of uniform items is usually the cheapest of the three options. The main drawback is the need to modify the blouse and trousers to fit wartime standards.
Things to Look For
Things to Watch Out ForThe seller claiming the item belongs to a specific "elite" unit. Often a seller will describe an item as being a Para/SAS/Commando/Airborne item, when often times it was not. Chances are the seller is trying to pawn off an item that is NOT wartime issue (and trying to piggyback on the "scarcity" of the item), or trying to increase an article’s value by claiming it to be something it is not. How can you tell if it is an "elite" piece of equipment? It all comes down to research. If you do your homework and know your stuff, it is easier to spot a fake. As a general rule of thumb if an item is claimed to have been used by an elite unit, chances are they never actually were, especially in the case of "new" or unissued stock. As well, look at the price. It is not a perfect measure of authenticity, but by and large if the item is a really great deal and it is claimed to be that "rare Airborne item" then chances are it is not what the seller is claiming it is. Like the old adage says, "if it seems too good to be true, chances are it is." Watch out for blackened hardware. Nothing gives away postwar-issue web gear like blackened hardware. Both Canada and the Brits used natural brass well into the fifties in their web gear, so anything black would obviously be postwar. There are some instances of units colouring the brass on their web gear, but these were the exceptions rather than the rule. A word of note though, as natural brass hardware WAS used on postwar web items well into the fifties. Such web pieces are acceptable to use in re-enactment events but make sure they are cleared ahead of time by unit leadership. Also watch out for tab closures on web equipment such as the basic pouches. Tab closures are a definite sign of postwar web gear. Once again though, there are some exceptions to the rule. The light respirator bag (Mk. III) is a good example of a tab-closure, wartime issue piece. Watch out for reproduction web items. They are made to look as close to the original, but often there are many ways to differentiate. Easiest is the repro maker has stamped it with his company’s name. Often done because a manufacturer does NOT want someone passing off his item as real as it makes him look bad. Also look out for abnormally large sizes for web gear (as in web items being unusually long, usually belts and anklets) as really big gear did not exist. Once again, reproduction web items CAN and quite often ARE used when original pieces are very hard to get, just make sure that the item you’re buying was actually used, and not something that someone thinks was used. Look at the quality of the equipment you’re looking at. As much as there was a war going on and they were looking to save on manufacturing costs, the stuff was, in most instances, made very well. Many people use web gear for camping and hunting today, and handymen and plumbers have long known the benefits of using web gear to haul their tools. It is extremely durable and lasts a long time. How many 60+ year old antiques can boast the same feat? If it feels cheap or looks like it is of poor manufacture, chances are it isn’t real. If there is one tip that anyone who knows about equipment will tell you it is to learn as much about kit as you can. The most effective tool you can use is knowledge. Learn all you can, and never be satisfied with what you know. Most importantly, if you don’t know the answer to a question, don’t be afraid to ask!
|
|||||||||||||||||||||||||||||